
Oh, you were aware? Because you've noticed how heavily they feature in this post and this post and almost every conversation I've ever had online? I was worried that might be the case. Anyway, huge thanks to Dina for asking for kind-of-sorta-asking-for this, because I don't think I'd have thought to write it otherwise.
Are you guys ready to spend surprising amounts of time tearing your hair out in the name of aesthetic? Don't worry - the first ones are the hardest. You'll get a knack for it eventually.
Step 1 ~ Pick your aesthetic
You can probably predict that, since it is quite literally the name of the game, identifying and sticking with your aesthetic is pretty darn important - and honestly, most of the time it picks itself based on what you're trying to do. If you're making a collage for your favourite ship from a YA Contemporary, then you know you're looking for something cute and a little bit sugary; if it's a Ravenclaw theme, you want something more classic, with an air of learning and seriousness.

Step 2 ~ Find some images
I'm only going to say this once, so I'd better say it very loudly: IF YOU PLAN TO USE YOUR COLLAGE IN ANY PUBLIC CAPACITY WHATSOEVER, THE IMAGES YOU USE NEED TO BE PROPERLY LICENCED FOR DESIGN. This goes for if you're using it online, in print, on some missing cat posters ... you're probably okay if all you want to do is stick it up on your bedroom wall, but if there's even the slightest chance the photographer might see it, then you'll need to do things properly.
Luckily, it transpires this is relatively easy, provided you know where to look.
What I tend to do is make sure that all of my images are licenced under Creative Commons Zero - which means that the photographer is happy for you to use that particular work in any context, edit / remix it, and even make money out of it without giving credit, provided you don't pass the work off as your own. And, of course, credit is always appreciated. My favourite search engine to use is Unsplash, because the sheer artistry involved in its photos is stunning, but their selection isn't huge - if you're struggling to find something specific you definitely want, then Pixabay is a good backup. I also found Pexels when I was doing the research for this post, and their library is seriously impressive.

I like to at least attempt to get some different-shaped photos - some portrait, some landscape, some square - since they make for a more interesting collage. This can be tricky though, particularly if you're struggling to find what you want, so don't worry too much about it if it's becoming a headache.
Step 3 ~ Open a blank collage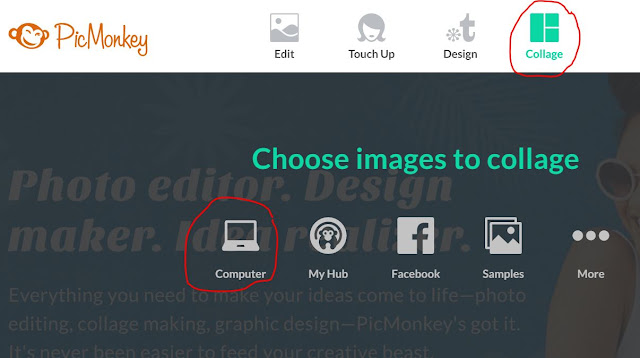

I use PicMonkey to do this because it has a specific collage function and you can use it straight out of your browser pretty much hassle-free. (Absolutely #NotSpon, just to be clear.) If you're a diehard Canva or BeFunky or insert-other-photo-editor-here addict, then I guess you probably could use whatever you're more comfortable with, but I only know PicMonkey, so you'd have to be pretty confident that you can make it work by yourself or with some other tutorial.
If you are using PicMonkey, you'll want to hover over the "Collage" icon in the top menu and select "Computer". Select your required photos from whatever folder it is you have them in (check Downloads or Pictures if they've disappeared entirely) and you should be taken into an editing screen that looks something like this:
Step 4 ~ Choose your layout
This can be as simple or as complicated a step as you need it to be: to insert a photo into a collage, just drag it from the photos menu on the left of the screen into one of the hatched grey areas (or cells) on the picture itself. I tend to just start sticking photos into cells to see if they work, messing with the shape (which you can do pretty easily by dragging the dotted lines) and adding in more if I need to (to add a cell, just drag a picture into a space between two existing ones, and it should just appear). The interface might take you a few experiments to figure out, but it isn't that tricky once you've had a little practice.

If you're unsure about finding a way to fit pictures together, then you can use one of PicMonkey's pre-made layouts - switch from "Photos" to "Layouts" (the second icon down) on the left hand menu - and just start sticking your photos into that. Don't feel locked in by the proportions, either - you can click the little padlock at the bottom of the screen and drag at the edges of the collage to change the size around as required to ensure your photos aren't squished.
Step 5 ~ Make It Pop!
If you've followed all the steps above, then you should technically have yourself a finished collage. But is it a little meh? Don't worry! Here are some things which I think make a big difference to the appearance of a nearly-finished collage.
- Colour the borders between the pictures
- See that little paintbrush icon? The very last one in the left hand menu? If you click on it, you can change the thickness of those borders (or make them disappear), round the corners, or change their colour. If you find a colour that matches the palette of your pictures, it makes them look a lot more coherent, and anyway you should avoid white when publishing to a blog with a white background because the edges kind of disappear and it looks funny. I like to use the little eye-dropper to pick a colour directly out of one of the pictures, because otherwise the exact tone is ridiculously difficult to replicate.

- Focus in on certain parts of each image
- If you hover your cursor over an image in a cell, you should see a sort of pencil in a circle. Clicking on it will give you the option to change the zoom, and dragging the picture around within the cell allows you to move it so that different sections are in the frame. This effect is perfect if there are certain parts of an image that don't fit your aesthetic, because it allows you to focus in on only the colours that match.

- Add in swatches and colours
- Have a space to fill on your layout, but no image to fit it? No worries. By clicking on the "Swatches" tab, which is the third icon down on that left hand menu, you can find loads of cute patterns to add (they're organised by theme, so make sure you click on the drop down menu and look at each one in turn to get the full selection). They're especially great for really cutesy aesthetics, but if you can't find one to fit, you can always just choose a block colour by clicking back on that paintbrush and selecting "Cell" instead of "Background". Click on the specific cell to fill it.

***
In the comments: Did you find this useful? Send me links to your aesthetics! Is there anything else you need to know?


Ooh, finally, you reveal your secrets!!! I love this and I'm definitely trying it ASAP. I always appreciate links to good picture sites to use so no copyright issues get in the way. This looks like tons of fun!
ReplyDeleteI'm glad you want to give it a try - you're pretty good at it, if your Twitter is any indication! And those copyright-free sites are an absolute goldmine, so enjoy.
Deletehttps://pin.it/c76e6m4n2b2sz3 - The first of many I'm sure. Probably not very good but it's mine so I like it haha. Thanks so much for the tutorial!
ReplyDeleteThanks for a grreat read
ReplyDeletethis very informative article thank for sharing advice
ReplyDeletehttps://clippingservicestudio.com/